Maestro: Alternative & simpler mobile automation
In this post I'll be running through a review of Maestro, a new way to create iOS and Android tests using only .yaml files.
Context
To provide some background about how Maestro works and its purpose, I'll share these highlights from their docs:
Maestro is built on learnings from its predecessors (Appium, Espresso, UIAutomator, XCTest) to introduce a brand new method of mobile automation.
Built-in tolerance to delays. No need to pepper your tests with sleep() calls. Maestro knows that it might take time to load the content (i.e. over the network) and automatically waits for it (but no longer than required).Blazingly fast iteration. Tests are interpreted, no need to compile anything. Maestro is able to continuously monitor your test files and rerun them as they change.
Simple setup. Maestro is a single binary that works anywhere.
For more info, read up more on the official Maestro docs.
Getting started
Dependencies
If you're familiar with using Appium for Android or iOS tests, then it's a very similar process here as you'll still require Xcode & Android Studio. I'm a big fan of how homebrew safely and reliably manages installs. It's no different in handling Maestro too.
brew tap mobile-dev-inc/tap
brew install maestroWhen installing Maestro, I came across this error below:
Error: An exception occurred within a child process:
  CompilerSelectionError: maestro cannot be built with any available compilers.
Install GNU's GCC:
  brew install gcc
Now this was resolved by simply following the suggestion of brew install gcc and voila! Back on track.
Android
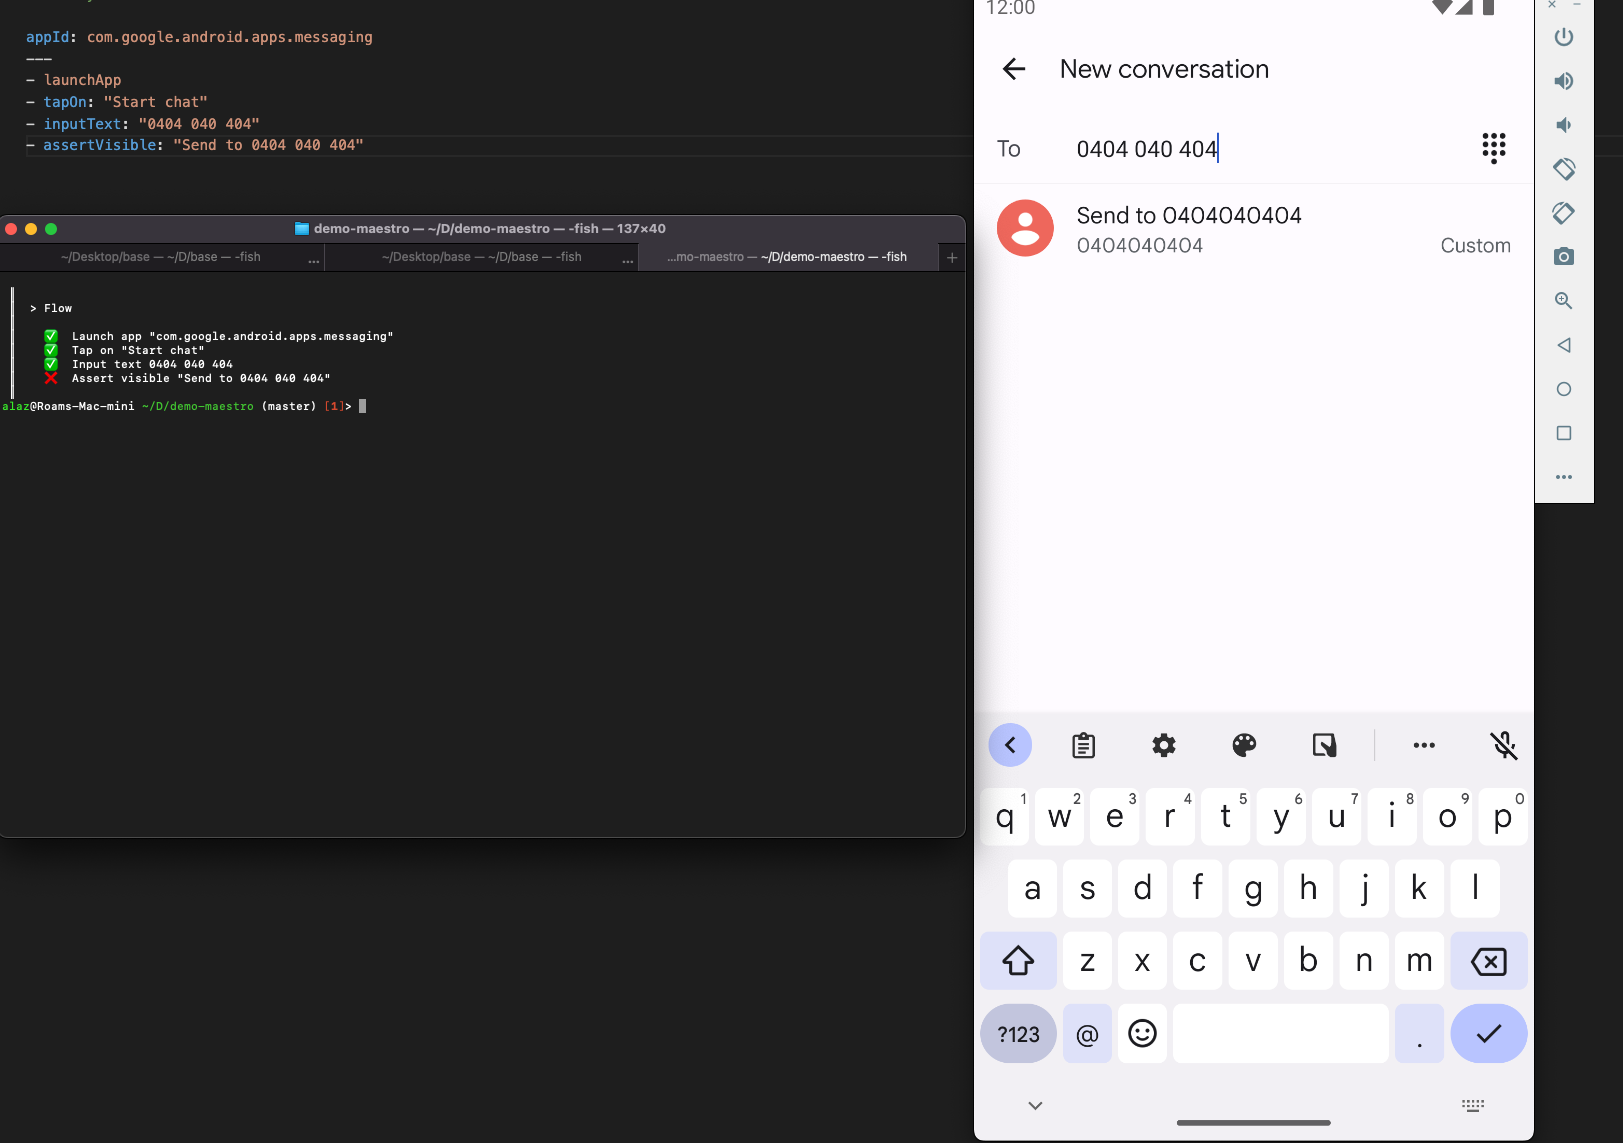
Using the Androids native messaging app, I mocked up a quick test. Performance was pretty fast. The actions tapOn and inputText were consistent in their speed.
Launch your emulator using Android Studio or by running emulator -avd avd_name. Once the emulator is up & running, execute your test with maestro test android-test.yaml and observe the results.
maestro test will automatically detect and use any local emulator or USB-connected physical device.

The assertion above could not pass however, as the assertion looks for an explicit match (expect 0404040404 to be 0404 040 404).
After correcting the assertion, this is what a successful run looks like.

Test details
appId: com.google.android.apps.messaging
---
- launchApp
- tapOn: "Start chat"
- inputText: "0404 040 404"
- assertVisible: "Send to 0404040404"
Over 3 runs, the average duration was ~15 seconds.
iOS
On iOS, you'll need a couple more steps to get ready.
brew tap facebook/fb
brew install facebook/fb/idb-companion
Once they are installed, you'll need a cli process running the following:
Use xctrace list devices to list out all your iOS devices/simulators with their respective udids. Grab a udid and throw it in the following command: idb_companion --udid {id of the iOS device}.
idb_companion in a separate process as this needs to be active for the test execution to connect to the simulator.
Test details
appId: com.apple.MobileSMS
---
- launchApp
- tapOn:
    below:
        id: "ConversationList"
- tapOn:
    id: "messageBodyField"
- inputText: "Hey there, this is an automated test."
- tapOn:
    id: "sendButton"
# - assertVisible: "Hey there, this is an automated test."
Hmm this was frustrating. I was unable to actually check the desired values in this test, as Maestro was unable (or unwilling) to interact with many elements that I specified. For my test case above, I was also unable to validate that the text message had been sent (with even that being a secondary test as the initial idea was blocked by limitations).
Writing this test for iOS was pretty cumbersome and tedious as I could rarely interact with the elements in the way that I initially desired, often requiring substitutions or workarounds. Thankfully, for the test case that I eventually ended up with, it performed consistently and at a decent speed.
Findings
Here's a list of features (or errors in some cases) that make Maestro great along with items that highlight where it's lacking.
Android
- command duration varied, mostly fast though
- overall test run pretty fast
- no configuration nor headaches when setting up & running tests
- I could trust the commands and have faith in my test design
iOS
- forgot to run
idb_companionbefore running test, causing test to fail (user error 😑) - could not launch tests on iOS 16, with the test logs not providing any assistance here (known issue)
- could not interact with the first element in my test, it would rarely find it and proceed
- had to complicate
tapOnin order for the first action to pass successfully - could not find a solution to navigate back a screen (avoiding having to use coordinates)
- elements were tricky to find and interact with, as a workaround I used Mac's Accessibility Inspector to inspect UI attributes
- when commands were valid and functional they were executed with decent speed
General
- app does not quit after test completes (this is what I've come to expect as normal behaviour after using Appium for so long)
- I like that the cli is cleared (presumably by running
clear) when eachmaestro testis run, it increases the focus of the cli to the current test run (scroll up in cli to view previous logs) - lacks any reporting or detailed logging functionality, though there tends to be a dump of the stack trace when compile errors are encountered which is helpful
- the test results printed in cli directly match the test steps defined in the
yamlfiles, reducing any confusion and makes results clearer to understand for all types of users - console logs use emojis to display results, which are great for when results pass, but no so helpful when you're troubleshooting failing tests and errors close to midnight ❌ ⁉️🐙🌋
- don't see any way to contain multiple test cases within a single flow file, leaving test cases to exist as individual files (i.e flows)
Extras
Hierarchy
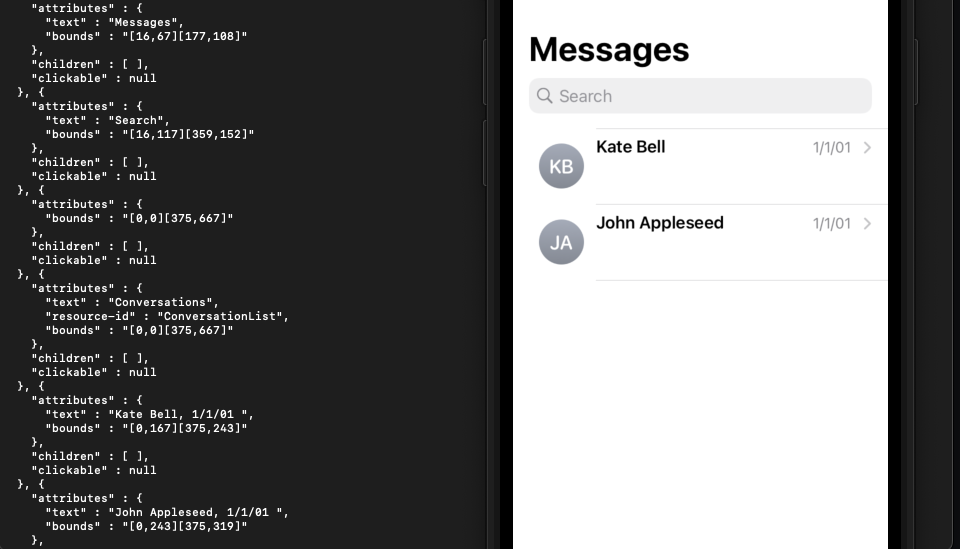
You can use maestro hierarchy to print an object tree of all the elements & attributes visible on screen.
Example below is for the iOS iMessage app. I would probably use this if I wanted to understand the property tree before setting up selectors.
For the below example, I could not interact using "Kate Bell", instead I had to use a parent element id as an anchor and select the child element from that point on. This was a common theme for my iOS experiments, whereas Android UI was more reliable. 🌟

"clickable": null for my liking ... Syntax
The syntax used in Maestro strikes similarities with Robot Framework, where a combination of plain English and clear test commands enables engineers to design tests in a much quicker fashion and gain a quicker return on investment.
*** Test Cases ****
Verify Accessibility and its sub menu
    Wait Until Page Contains  API Demos
    Select a menu option  Accessibility
    Check Accessibility
    Go back to root menu
Logic
Unfortunately I don't see a way to store and utilise properties in flows. This isn't necessarily a deal breaker, however I regularly store properties to manipulate, act upon or validate in tests. Additionally, currently there is no support to ingest data from external files.
Speaking of ingestion 😮, flows can be accessed from within other flows using - runFlow: anotherFlow.yaml. This allows logic to be utilised in a modular fashion across the test suite, reducing duplication.
Summary
All in all, I was surprised by what Maestro offers and how it differs to its alternatives. I tend to use code-heavy and customizable frameworks but I can see a use-case for Maestro, primarily for less complex applications and test logic (given its current features).
With support for the basics, cloud integration for remote execution and a growing user base, there's massive potential for Maestro to expand and succeed🔮 .
Stay tuned as I'll be keeping an eye out on Maestro and it's future developments. ✌️


